Import H.264(AVI/MP4/MOV) to Final Cut Pro for editing
To edit your H.264 video clips, adding titles/music or effects, FCP could be your good choice. It has the function of direct trimming of H.264 video and audio clips in the timeline and enriching the H.264 videos with color correction, etc. But what if you have some H.264 video files which are unrecognizable by Final Cut Pro? That's a common problem
H.264 codec needs a lot of processing power to decode, so it is not easy to play and edit H.264 files in FCP or other editing programs. To get around the trouble, a simple workaround is to convert H.264 to ProRes, a native format for Final Cut Pro. 
I used Brorsoft Video Converter for Mac to encode all of my H.264 videos to ProRes for using in Final Cut Pro X or FCP 6/7. Overall, it is one of the best H.264 file converter tool for us. The program comes with several optimized formats for FCP- ProRes 422, ProRes 422 HQ, ProRes 422 Proxy, ProRes 422 LT and ProRse 4444, which enable you to transcode H.264 for editing with FCP directly without any rendering or codec problems. Plus, it also allows you to convert H.264 to DNxHD for Avid Media Composer, Apple InterMediate Codec for iMovie, MPEG-2 for Adobe Premiere Pro, etc with best results. Download it and follow the tutorial below to convert H.264 videos to FCP effortlessly.
Tutorial: Encode H.264 to ProRes for FCP with perfect audio/video sync
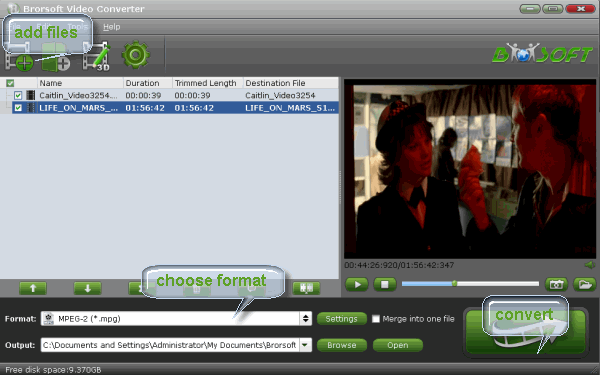
Step 1: Add H.264 files
Install and launch the H.264 to FCP Converter, and then click “Add Files” button to import your H.264 MP4/MOV/AVI files to the software.
Tip: If you wanna combine H.264 video clips into one file, you can click the “Merge into one” box. 
Step 2: Select output format
Click the "Format" bar and select Final Cut Pro> Apple PreRes 422(*.mov) as output format. This format is specially designed for FCP, so that you can edit your original H.264 video in Final Cut Pro perfectly. 
Step 3: Convert H.264 to ProRes for FCP
Click the convert button under the preview window, the converter will start encoding H.264 clips to Apple ProRes for importing to Final Cut Pro.
Some more helpful features of the H.264 to ProRes Converter:
1. Settings- Click it to customize audio and video parameters Video Codec, bit rate, frame rate, Audio codec, sample rate, audio channels.
2. Editor (next to “Add” icon)- Click to set add watermark, deinterlace, trim, crop, add subtitles, etc.
Soon after the conversion is finished, just click “Open” button to get the converted H.264 files for editing in Final Cut Pro X or FCP 7 perfectly.
More Guides:
How to rip and copy Blu-ray to Amazon Fire TV
How to encode Blu-ray ISO to MKV fast and easily
How to get iMovie work Nikon D7200 MOV perfectly
Add MP4 video to Windows Movie Maker For Editing
Put DVD to iDVD with fastest speed and simple to operate
Sony Handycam MTS files to Pinnacle Studio best workflow
Work with XDCAM EX MP4 files in Avid Media Composer
Import MOV to MPEG-2 for Cyberlink PowerDirector 13/12 Ultra
Play DVD movies on Windows Media Player with HD WMV format
Source: Import H.264(AVI/MP4/MOV) to Final Cut Pro for editing
DVD to Xbox 360- Play DVD movies on Xbox 360
Summary: Find Xbox 360 can’t read and play your DVDs? You can rip the DVD to Xbox 360 supported common videos like WMV, and then you can stream them over to your Xbox 360 for enjoyment without limit.
Xbox 360, a hot console brings you a total games and entertainment experience. As it claimed, you don’t need any special software or hardware to play DVDs on Xbox 360. While, there are still many owners have troubles watching DVD movies on Xbox 360. That’s because each Xbox 360 console is manufactured for a specific DVD and game region. The Xbox 360 console can only play discs that are sold in the same region as the console. If you want to put DVDs in different regions to Xbox 360, problems will occur due to the copy protection. This article aims to give you the quick fix.
The best solution to copy DVD movies to Xbox 360 is to rip DVD to Xbox 360 friendly videos with Brorsoft DVD Ripper, and then you can stream them over to your Xbox 360, by managing through Media Center Extender (MCE) via a home network to Xbox 360.
Overall, it is a professional and easy-to-use DVD to Xbox 360 Converter. It offers specified video formats for Xbox 360 and many other game hardware like PSP, PS Vita, PS3 and more. With it, you will be able to watch any DVD movies via Xbox 360 easily. Its build-in editor lets you touch up the DVD video as you like, which include trimming, cropping, merge and apply special visual effects, etc. In one word, Brorsoft DVD Ripper is exactly what you need.
Steps to convert DVD to Xbox 360 with ease
Step 1. Import DVD movies
Download and install DVD Ripping software. Launch it and click the Import DVD button to load the DVD files that you want to convert to play with Xbox 360. Both ISO, IFO and files in DVD Folder can be loaded.
Step 2. Select output format
This DVD to Xbox 360 Converter provides optimized presets for Xbox 360. So in this step, you can just choose the ready preset for Xbox devices as the output format, which will remove all the incompatibility issue.
Tip: If you are not satisfied with the presets, you can click “Settings” to change the video encoder, resolution, frame rate, etc. as you wish.
Step 3. Start converting your DVD to Xbox 360
When all settings are done, simply click the Start button to begin the conversion from DVD to Xbox 360. You will get the files converted ready in a few minutes. Enjoy.
Related guides:
How to Convert DVD ISO to MP4 Easily and Fast
Importing DVD movies to After Effects for editing
How to Convert Blu-ray to DivX files with Subtitles
The Best Way for playing DVD on EVGA Tegra Note 7
How to Convert DVD to Galaxy Tab Pro 8.4 readable format
Watch DVD movies(DVD/DVD ISO) on Sony Xperia Z2 with subtitles
Source:Steps to convert DVD to Xbox 360 with ease
iTunes and MP4-Add MP4 videos to iTunes without problem
Summary: Can't upload MP4 files into iTunes library? Follow this article, you will know clearly how to import MP4 files to iTunes without problem.
Althoug iTunes announced that it could support MP4 files, users still encountered issues while trying to import MP4 videos into iTunes.
"Installed iTunes 10.6.0.40 for the first time on WinXP machine. No problem adding MP3's to my library. iTunes will not allow me to add mp4/avi/mkv (tv shows) to iTunes even with add a file manually. They play on my PC in Quicktime so they are valid files. Why?"
MP4 is a media container format which can be encoded with many different video and audio codecs like DivX, Xvid, H.264, H.263, MPEG-4, AC3, WMA, AAC, etc. While iTunes only supports few video and audio codec like MPEG-4/H.264 and AAC. That is to say, if the MP4 video is encode with iTunes unsupported video or audio codec, iTunes will not accept it.
To solve MP4 and iTunes incompatible problem, an ideal tool--Brorsoft Video Converter for Mac can help you out. It can convert any type videos like AVI, MKV, MPG besides MP4 to iTunes supported MOV/ MP4 format without losing any video quality on Mac OS X(Mavericks included). Apart from that, its built-in editor can help users to do some basic editing work before conversion, like trimming, cutting, adding audio information/watermark .ect. If you are a PC user, Brorsoft Video Converter is specially designed for you. Now, download the App you want and follow below guide to start MP4 to iTunes conversion.
How to make iTunes ingest MP4 videos easily
Step 1: Import MP4 files to App
Install and run the video converter, and then click the "Add" button to load MP4 videos. You can also use the drag&drop method to load the media files to the app.
Step 2: Select iTunes supported format
Since iTunes supports MP4, M4V and MOV formats, you can click Format bar and choose any of the three from Common Video as the output file format. If you want to add MP4 to iTunes for syncing to iPhone, iPad, Apple TV, you can directly select a format from special device column like iPad.
Tip: Click the Settings icon to adjust video and audio parameters, like audio&video bitrate, video size, channel as you need.
Step 3: Start MP4 to iTunes conversion
Click the "Convert" icon after all settings, and the Video Converter will start transcoding MP4 to iTunes on Mac OS X immediately.
Step 4: Import MP4 to iTunes library
After the conversion, get the output files by clicking the Open button. Now you can open iTunes and go to File > Add to Library or directly drag&drop the converted video to iTunes.
More Posts:
What is a good Alternative for CloneDVD?
Tricks for Editing GoProMP4 files in iMovie
An Effective Way to Play DVD on EVGA Tegra Note 7
Get smooth playback of Blu-rays(ISO) on Surface Pro 3
GoPro HD Hero 2/3/4 to iMovie 8/9/11 Best Workflow
Copying DVD movies to EVGA Tegra Note 7 with subtitles
Source:How to Add MP4 files into iTunes Library
How to Native Import Canon MOV footage into Adobe After Effects
Summary: If you encountered problems importing Canon .MOV files into Adobe After Effects CC/CS6/CS5/CS4 on Mac OS X, you can follow this article to find the solution and solve it effortlessly.
While enjoying the stunning HD video quality of Canon DSLR .MOV footage, many folks may find it’s a painful experience to import Canon MOV into Adobe After Effects for further editing. In this article, I will give you the solution to fix the Canon MOV in After Effects CS4/CS5/CS6/CC playback and editing issues.
As well known to all, Canon 60D, 70D, 700D, 5D Mark III, 1D X, Rebel T5i, etc are all very popular sellers in the Canon DSLR series, and also in the photography market. While, a bit frustrating, the Canon .MOV highly compressed files are still not well supported by Adobe After Effects including the latest CS6, CC, as you may encounter many audio and video problems. And I know that After Effects can’t handle raw MOV videos encode in H.264, so there is no doubt that it will take more time on rendering while ingesting the files. Back to the point, if you're attempting to edit Canon MOV clips in After Effects, what's the available workaround?
The easy option to get After Effects work with Canon MOV footage beautifully is to encode .MOV to MPG or WMV and then re-import it. This will help you import the Canon file correctly and saving the rendering time. To fulfill your task, you can just get Brorsoft Video Converter for Mac, a powerful video converter, editor and player. With it, you can fast transcode Canon MOV to Adobe After Effects supported videos with optimized settings while keeping the original video quality. Besides, the all-in-one toolkit can convert all other popular videos AVI, MXF, MP4, WMV, MKV, FLV, MTS, VOB, etc. to Adobe After Effects, Premiere Pro, iMovie, FCP, FCE, Avid Media Composer and more NLEs natively supported video formats on Mac OS X (Mavericks included). For windows users, please turn to Brorsoft Video Converter to get the work done.
Converting Canon MOV to After Effects compatible formats
Step 1. After downloading, install and run this MOV Converter for After Effects, just copy the MOV files from your camera to your hard drive. Import the files to the software for converting.
Step 2. Click “Format” bar to choose the output format. Click and choose “Adobe Premiere/Sony Vegas” > “MOV (AVC) (*.mov)”, or “MEPG-2(*.mpg)” as the best format for editing Canon MOV in After Effects.
Tips - Click "Settings" button, you can adjust the video and audio parameters, including the Bitrate of Video&Audio, Video Size, Sample Rate, Frame Rate, Audio Channels, etc., by clicking the Settings button on the main interface for getting the best quality.
Step 3. Click the arrow button to start converting Canon MOV to MPG(MPEG-2) for Adobe After Effects.
After the process completes, click "Open" button to find the generated videos, and then you can transfer the recordings to After Effects easily and quickly. In this way, you can edit your Canon H.264 .mov files in After Effects without issues.
More Guides:
Import Canon 1080p MOV Files to Final Cut Pro
Easy way to convert MTS files to .MOV for free
How to Get Final Cut Pro work with MPEG files
Can Adobe After Effects import Nikon MOV footage?
iMovie does not recognize MPEG 4- Any workaround?
Tricks for Editing Nikon D810 MOV in Windows Movie Maker
Source:Edit Canon MOV files in Adobe After Effects
Easy way to convert and import MP4 to iMovie '11/'09/'08
Summary: Wanna editing MP4 files in iMovie, but iMovie won't import your MP4 videos? Here you'll get the solution. Learn details.
As is known to all, iMovie is a great tool that allows Mac users to edit their own home movies. If you have hours and hours of MP4 videos, you may want to edit MP4 with iMovie (iMovie 11). However, iMovie doesn't allow you to select the MP4 file sometimes. That's exactly what I gonna talk about here - how to import MP4 to iMovie on Mac, for those who have the problem likewise.
According Apple official website, iMovie (including iMovie '11/'09/'08) can only import DV, MPEG-4, MPEG-2, MOV and M4V. Though the MP4 file format defines the storage of MPEG-4 audio, scenes and multimedia content using the ISO Base Media File Format, the MP4 file may also contain any number of audio, video, and even subtitle streams. So it is impossible for the MP4 file to determine the type of streams in an MPEG-4 file based on its filename extension alone. Therefore, you may have some clues that why people using Mac (even Mavericks) always meet difficulty in importing mp4 into iMovie. The following paragraph I would show you how to convert MP4 to iMovie compatible format on Mac with Brorsoft Video Converter for Mac, which can be considered as the best MP4 to iMovie converter utility.
It provides the optimized video profile- Apple InterMediate Codec .mov for iMovie so you don't need to be bothered by the incompatibility issue. In addition, this wonderful tool also lets you convert AVI, WMV, MKV, FLV, MOV, MPEG, etc. to iMovie and convert between any regular video formats. The upgraded version is highly compatible with Mac OS 10.9 Mavericks. Get the software and follow the simple steps below to change MP4 to iMovie with ease.
Step 1. Import MP4 files into the Mac program
Here you can directly drag & drop the MP4 files to the converter, or go to "File" menu then choose Add Files" to load the MP4 files.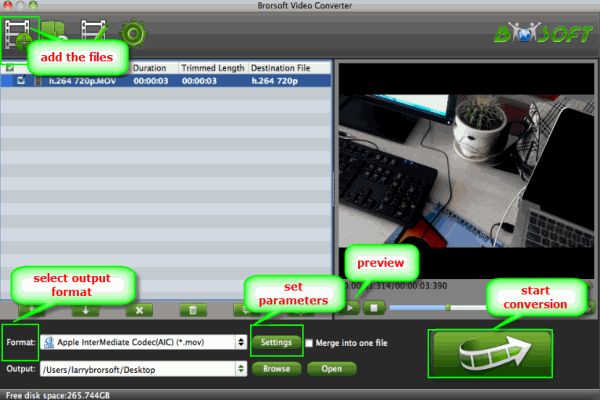
Step 2. Pick iMovie as the output format
You can directly choose the preset for iMovie which has been supplied by the MP4 to iMovie Mac Converter. The setting works for iMovie '08, iMovie '09, iMovie '11, and iMovie HD etc. Moreover, the Mac program has some simple edit functions like cropping, splitting, adding effects etc. 
Step 3. Start MP4 to iMovie conversion on Mac OS X
Before the MP4 to AIC .mov conversion, you can click Settings icon to adjust the video, audio settings. Finally, click the "Convert" button, and then leave the MP4 to iMovie Converter to do the rest automatically for you on Mac OS X (Mavericks and Mountain Lion Included).
After conversion, you can freely use your MP4 files in iMovie '08, iMovie '09, iMovie '11 to create your own masterpiece with the best quality.
More Topics:
How to Rip and Put DVD on Galaxy Tab 4
How to Import MP4 to Avid Media Composer
Put and play Blu-ray on Galaxy Tab S 10.5/8.4
How to Convert MTS for best use in After Effects
MXF files don’t work in Adobe Premiere Pro CC- Solution
Transcode Nikon D810 MOV clips to MPEG-2 for Premiere Pro
Source:How to Convert and Import MP4 files into iMovie
How to view AVI movies on Nexus 7/Nexus 7(2013 version)
Summary: Having problems when playing AVI files on your Google Nexus 7/Nexus 7(2013)? Check out this tutorial to get the best solution I share with you.

From the Google official website, we can easily find Google's new Nexus 7(2013 version) and Nexus 7(2012) supported video file types including MPEG-4, H.264, VP8. Unfortunately, AVI is not there. However, despite lack of official support, we still can watch AVI videos on Nexus 7/ Nexus 7(2013) smoothly. Here I'm sharing my experience to help those who are wondering how to put .avi files onto Google Nexus 7 for enjoying flawlessly.
To get AVI files to play on Nexus 7/Nexus 7 2nd-gen nicely, the easy workaround is to encode/re-encode AVI to Nexus 7 compatible video formats (e.g. H.264 MP4) in advance. Download and install Brorsoft Video Converter, which is the optimal tool I prompt here. Overall, the program can be used as an all-in-one video conversion app for Nexus 7 tablet. Besides AVI, it can also help you encode/re-encode almost all 1080p/720p HD videos including MKV, VOB, MPG, MOV, TiVo, MTS etc. for Nexus 7/Nexus 7(2013) as well as Galaxy Tab 3 10.1/8.0/7.0, Galaxy Note 3, Galaxy S4/S5 and other Android tablets. It has an equivalent Mac version entitled Video Converter Mac, which can convert .avi videos to Nexus 7 on Mac OS X (Include Mountain Lion and Mavericks).
The Easiest Way to Convert & Play AVI files on Nexus 7/ Nexus 7(2013 version)
Step 1: Install and run the best Google Nexus 7 Video Converter. Click add to Import AVI video files to it. Batch conversion is supported so that you can add multiple files for conversion at a time.
Step 2: Click "Format" bar, you can easily find the optimized videos for Nexus 7 and Nexus 7 2nd-gen under Android > Google Nexus 7 H.264 Video(*.mp4). The output videos could fit on the Android based tablet perfectly.

Step 3:You can also click "Settings" to change the video encoder, frame rate, resolution, etc. Remember the file size and video quality is based more on bitrate than resolution which means bitrate higher results in big file size, and lower visible quality loss. According to my experience, for watching movies on the Nexus 7, 720p with 1500kbps~2000kbps is just all right. Of course, you can view full HD videos on your new Nexus 7 2013 version with 1080p resolution.
Step 4: Start AVI to Nexus 7/Nexus 7(2013) conversion by clicking "Convert" button.
Pretty Simple. Once the process completes, transfer the converted AVI videos to your Nexus 7. So there you have it. Now just enjoy AVI videos on Nexus 7 tablet anytime anywhere.
Additional Tips:
If you are considering to get a powerful all-in-one tool to convert videos, Blu-ray movies and DVDs to your Nexus 7/Nexus 7 2nd generation or other devices like, Nexus 10, iPad, Kindle Fire HD(X), Samsung Galaxy Note 3, Galaxy S5, Galaxy Tab 3 meanwhile saving time and effort, the all-in-one Blu-ray Video Converter Ultimate program will a nice choice for you. If you are running a Mac OS X computer, iMedia Converter Mac is the alternative.
See also:
Transfer MKV to Nexus 7 for smooth playback
Put and play XviD AVI movies on Nexus 10 tablet
Simple steps to convert DVD movies to iPhone 6
Easily Open MKV/VOB/AVI videos on iPhone 6
Transfer/Copy DVD movies(ISO, IFO files) on Galaxy Tab 4
QuickTime Tips For Ripping DVD ISO files to MOV format
Source:How to view AVI movies on Nexus 7/Nexus 7(2013 version)
Insert/attach subtitles(SRT, ASS, SSA) to a .MP4 file
Summary: If there is no embedded subtitle in your MP4 movie files, you’d better try to add subtitles(SRT, ASS, SSA) to MP4 video for better enjoyment. Here is how to.

As is known to all, you can always find subtitles you want on the DVD, BD. While, if you have some digital videos like MP4 with no embed subtitles, fear not: you can still add subtitles to MP4 movie file within a few clicks. Today I will share some tips and tricks for adding subtitles to MP4 files.
First of all, you'll need to find the subtitles online at Opensubtitles or Subscene (you have other options, but I've had the best luck with these two) by searching for the movie's name and the language I'd like.
When you find suitable subtitles(Make sure your MP4 video and subtitles names are the same.) and now get Brorsoft Video Converter to add subtitles to MP4 movie to play on your computer, PS3, VLC player, QuickTime, iPad, Galaxy Tab, Nexus 10, Kindle Fire HD and more.
Overall, it is a powerful all-in-all video tool, which can both convert videos in all popular formats and customize subtitles for your movies. With it, you can attach many kinds of subtitles to MP4 video like in .srt, .ass, .ssa. It also helps to set the subtitle size, subtitle style, etc according to your preference. Aside from inserting subs to MP4, it also can add watermark/effect/audio track to MP4, trim MP4, crop MP4, and etc. Moreover, all the above functions also apply to other video formats like MKV, AVI, MPG, WMV, MOV, 3GP, VOB, FLV. If you are running on Mac OS X like MacPro, Mac Mini to add external subtitles to MP4, AVI, MKV, etc, turn to Brorsoft Video Converter for Mac. Here's how to get subtitles on MP4 movies, regardless of where you're getting them.
How to add subtitles(SRT, ASS, SSA) to MP4 with ease
Step 1. Import the MP4 video
After you install and open the converter, you can directly drag the target videos to the program or click “File” to add the MP4 videos.

Before loading source video, you need copy .srt (or other subtitle file) to MP4 video folder, rename .srt file according to the video name. And if you add more than one .srt files to the MP4 folder, you can rename the .srt file name like this: if source MP4 file name is “michael.mp4”, the .srt file names can be “michael001”, “michael002”, etc.
Step 2. Add subtitles to MP4 movie
Click on “Edit” button, the video editor will pop up. Tap “Subtitle” option and check the “Enable” icon. Then, by clicking on “Browse” to import your *.srt, *.ass, *.ssa subtitle file you’ve downloaded. Click OK to save the settings.
P.S. You can also add watermark, apply effects, and crop video in the above video editing window.
Step 3. Start adding subtitles to .mp4
If you need convert the MP4 video files to other formats, you can select a format from the Format list before the conversion. Or just keep MP4 format. Then click Convert and the rest will be finished automatically.
After the conversion, the subtitles file will be embedded into the output MP4 video. Now you can play your MP4 files with subtitles anywhere you want. Enjoy.
You also may like:
How to convert VOB files to Final Cut Pro
How to transfer TiVo shows to iTunes library
How to Import Nikon MOV into Final Cut Pro
How to play VOB files in Windows Media Player
How to Convert Disney DVD Movie on Mavericks
How to Rip and Convert DVD to MPEG without quality loss
Source:Attaching External subtitles to your MP4 videos